Wednesday, June 10, 2015

IKEA installation

Installation:
Our general contractor will also be doing the cabinet assembly and installation (including door handles, etc.) for $2800. Between YouTube videos and our previous experience, we could have done the installation ourselves, but we decided this was definitely worth the money. 

Day 6 of Renovation/Installation:
One of our contractor's crew spent a day assembling the boxes (while the rest of the crew finished the floor and installed the vent for the microwave).

Day 7: 
Minor issue - the IKEA planner had included a 12" base cabinet that would be cut down to 10" (to the left of the doorway). He said that a 10" x 30" door mounted sideways would serve as the door. However, our installers pointed out how different that would look relative to the other door panels. Our other options: use the Horde open shelving cabinets (9"), or stick with the 12" cabinets and make the doorway narrower (by 2") - we decided to go with the latter.


Day 8: our contractors needed to work elsewhere, so we had a day to gather items for the change in cabinet plans. We also needed two more suspension rails - somehow our kitchen planner misordered those.

Day 9:
Modified doorframe to accomodate 12" cabinet, continued installation of cabinets, installed microwave and most of undercabinet lights (Utrusta hardwired). We also had the template made for our counter (more comments below).


The doorway is now 30" wide - it's hard to believe it wasn't always that size. They had it finished in time for our counter template visit - our contractors are awesome!




Friday, June 5, 2015

Choosing materials

IKEA cabinets:
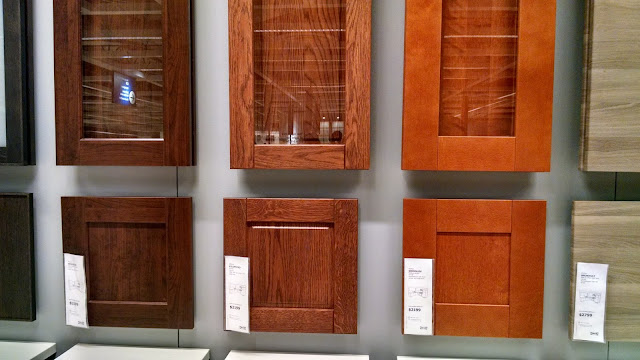
Our existing window trim and baseboards are all a medium brown, so we wanted something that wouldn't clash with that. I definitely did not want white. 


We considered Filipstad (center) but ultimately chose the Grimslov (right). The color is very close to the Bonde bookcases (medium brown) we have in an adjacent room, and we're very happy with how that look. We also think the Grimslov looks more modern without the strong wood grain effect.

Countertop:
We knew we wanted a tile backsplash, and that we would need to retile the floor. I was concerned about competing patterns/colors. This probably would have been easier if we had hired an interior designer. Our current countertop is a dark green laminate.

IKEA now carries Caesarstone quartz products. We also looked at Home Depot and Lowe's, as well as some independent tile shops (e.g., Trends in Tile in Brighton, MI). The prices at IKEA were the best during the kitchen sale (20% off). 


Caesarstone quartz in Belgian Moon (4100), ordered through IKEA. My second favorite color was Raven (4120). Ultimately we picked this because we decided to go with a red backsplash and gray floor tiles (see below).

IKEA doesn't offer samples for purchase, but you can order directly through Caesarstone for $4 (including shipping).


Belgian Moon on the left, Raven on the right. We chose the "eased" edge, which is included in the price. 

One of the current model kitchens at IKEA has the Grimslov cabinets with Belgian Moon counters (see below). When we ordered our cabinets, we hadn't decided on the counter/backsplash/floor tile combination yet. We finally sorted that out two weeks later, and I assumed that I would be able to get the discount for counter since the sale wasn't over. However, the first kitchen associate told me no - I was pretty upset but calmly made my argument - and she wouldn't budge. While she was busy with another customer, I asked a different associate who said she could "make it work" and entered the sale into a special binder (I believe it deals with adding to an existing order). I was so glad I didn't give up - we saved $645. 


Some other materials we considered: 


Stonemark Granite in Peacock Green (HomeDepot - $55/ft2). The quartz we chose from IKEA ended up being the same price with the kitchen sale.


Samsung Radianz quartz in Mirama Bronze (Trends in Tile - $72/ft2). We really liked this, but decided it was more brown than we wanted.


Floor tile:
We visited the Tile Shop and found several porcelain tiles we thought could work. The kitchen and our dining area are adjacent to other wood floors, and we like the look of the gray tile we have now, so we looked for something similar. Much to our surprise, the floor tile prices were lower at the smaller stores we visited (Virginia TileBeaver Tile and Stone, and Genesee Tile). We liked various tiles by Florim, Olympia, and Atlas Concorde. Bringing samples of the cabinet, counter, and backsplash definitely helped us make a final decision - though we ultimately borrowed some sample floor tiles and took them to the IKEA model that has our cabinet and counter choices.


Our final choice was Seastone (in gray) by Atlas Concorde. We really like how it looks like it contains fossilized shells - but it's subtle enough not to compete with the bold backsplash. It's a very similar in brightness to our existing tile.


Our second choice was Argile (in concrete) by Olympia. It's a bit darker and more industrial looking. 

In the IKEA model - Seastone by Atlas Concorde on the left, Argile by Olympia on the right. 


Backsplash:
Initially we didn't think we would want a tile backsplash, but after discovering Houzz and digging through pictures, we liked the kitchens with bold designs. Pinterest also gave us lots of ideas. Unfortunately most of affordable choices at HomeDepot and Lowe's were not in the colors or styles we liked. 

Some of the company websites we looked at were OceansideLundada Bay, and Alys Edwards. There are several tile stores on one street in Farmington Hills, MI that carry these brands (Virginia TileBeaver Tile and Stone, and Genesee Tile). 


The white cards were samples we ordered online; the rest were at Virginia Tile. Top row (left to right): Nova Roma matchstick (Coliseum Red) - Medici glass, Gigi's Groovy Glass (Cara Mia Crimson) - Alys Edwards, Tessara in various finishes (Red) - Oceanside Glasstile; Middle row: Falling Water Rainbow (Indian Red) - Lunada Bay, Liberty (Red) Trend - aka Laliberte by White Horse; Bottom center: a blend from Oceanside.

Our unfortunate discovery was that the samples on boards looked very different than other samples. In fact, one store ordered six sample cards of the same product for us, and they were all significantly different from each other (i.e., some looked more red, some more brown, some more orange, etc.) Considering how expensive these are (nearly $40/ft2) we were really surprised at these quality control issues - we wanted to know what shade we would actually be getting.

I found a reference to XS Studio on a message board - this is Oceanside's overrun store. The price was terrific ($20/ft2) for first quality tiles - and we were assured they were all from the same batch. I ordered one square as a sample; the shipping was pricey but it was worth it. We went with Muse (7/8" x 7/8") in red non-iridescent (777). Shipping from CA to MI for 42 sheets was $222. Also, their customer service was outstanding.


The final combination: Oceanside Muse in Red non-iridescent; Grimslov drawer front; Seastone gray tile by Atlas Concorde

Ordering and delivery

Ordering:
The short version:
-Expect to spend a few hours at the store (more if taking delivery yourself)
-Have your design finished
-Don't go on a weekend (or if you must, arrive when they open)
-Take lots of notes
-Make copies of your receipts (needed for the warranty)
-ALWAYS BRING YOUR FOLDER WITH RECEIPTS if you need to modify your order (including adding items) - you will be able to get the kitchen sale discount again (if you qualified with the main purchase).

We went early on a Monday afternoon - definitely a good idea, as there were very few customers in the kitchen department. Our two young kids were in school/daycare (an hour in Smaland would not have been enough!). We pulled up our IKEA kitchen plans at one of the kiosks, and an associate began processing the list. 

We also decided to add under-cabinet lights (Utrusta hardwired), so the associate helped us configure those (using a spreadsheet). Cabinet lights were eligible for the kitchen sale, so it was worth the additional time. I really wish I had taken good notes on the configuration of the lights; I'll have to go back and discuss that with an associate. Unfortunately they would not give us the discount on accessories (drawer organizers) but we bought them that day anyway. The entire process took a little over an hour.

We paid for everything in the kitchen department. They gave us a printout of the items in the self-service section: the lights and cabinet door handles, plus the accessories we had added. After we gathered those we headed down to the checkout area - but to our surprise, they didn't double-check our cart - so hopefully we counted correctly.

We knew our Traemand contractor/installer wasn't available until at least late May, so we wanted to postpone delivery. We placed our order on 3/30, and the latest delivery we were allowed to choose was 4/27. I still can't believe the delivery fee was only $99.  Four other items were back ordered; we had to monitor our store's inventory online and then visit the store. The store gave us a gift card for the amount of the missing items (with the 20% discount factored in). We only had to order one item through the website. I'm glad we didn't wait until later in the kitchen sale, as other people had many more backordered Grimslov items. 

One of the kitchen associates had put a hold on the missing items (some cabinet doors and a bracket). I kept checking the IKEA website for the stock prognosis on these. Surprisingly, she only put a one day hold on them - but there was no notification to us when they were available. I came to the store knowing one door was in stock, and just happened to be there on the right day - if I hadn't come, we would have lost our claim to the bracket (there is a long waitlist for it). I felt very lucky!

Update: I asked more about the procedure for missing items. The hold should have been seven days, and I was expected to call the store weekly to check on the status. Items only show up in the online stock prognosis if they have more than those that are reserved. 


Delivery day - 158 items arrived (the oven, microwave, and cover panel for the side of the refrigerator are out in the garage). It took a few hours to double check the list and organize everything (IKEA asks that you check this within 48 hours of delivery). 

Demolition and renovation

Demolition:
On 5/30 (Friday) we donated our appliances (except the refrigerator) to Habitat for Humanity. They scheduled a pickup and it was a breeze. We're taking the sink and some sections of countertop to them later (they only wanted the rectangular sections, not the L-shape). 

We decided to remove the cabinets and counters ourselves to save some money - our contractor will do the rest of the demolition. We could have finished this in a day, but we spread it out over the weekend. We removed them carefully - a friend wanted them.


The flooring is more than an inch above the subfloor - the original floor was vinyl, and the second owners put down red clay tile on top of that. They even grouted over the carpet at the transition to the adjoining room!


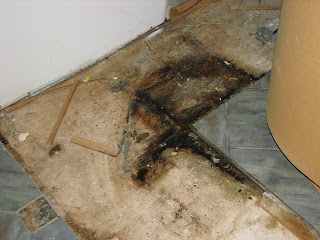
Unfortunately we did find some water damage from the leaking sink and the dishwasher drain line failure. There was mold under one of the corner cabinets, but it wasn't as bad as we imagined. We had already factored in replacing part of the subfloor into the estimate. 

We've read several remediation strategies online, but we will replace this section of subfloor. In the meantime we sprayed it with bleach (2%) and covered it with an old towel after it dried.


Weirdest discovery so far = dog food pellets under one of the cabinets. The first owners had dogs, so that kibble had been there for at least 13 years. We still can't figure out how the food got under there. 


Renovation:
Our IKEA kitchen planner gave us the name of a contractor (Bates Custom Carpentry). We met with him to discuss the following:
  • Demolition of existing tile floor
  • Installation of new tile floor 
  • Removal of about half the soffit
  • Installation of water line for refrigerator
  • Modifications to wiring and lights
The quote seemed very reasonable and his references were glowing. Also, his crew would do the actual cabinet installation after the modifications were complete. Traemand representatives were in touch with us about the design schematics and the installation quote, but the additional work was planned directly with Bates. 

Traemand uses a website (My Kitchen Workspace) to coordinate all documents. I don't find it particularly user-friendly, but I suppose it is better than sorting through lots of emails.

Day 1 (Mon): Demolition of floor and soffits


Day 2 (Tues): Fixed subfloor, ran water line for fridge, electrical work, started tile prep
The water damage to the subfloor was minimal, but we wanted to be safe and replace it.


Day 3 (Wed): Dry wall, finished prep for tile floor (laser eyes photobomb by Freyja the cat)


Day 4 (Thurs): Tile floor


Day 5 (Fri): Finish laying tile


Day 6 (Mon): Install microwave vent, assemble cabinet boxes, grout tile
Also, the other appliances (fridge and dishwasher) were delivered, and I painted the ceiling.

Design phase

IKEA in Canton, MI
I love IKEA. Every room of our house has at least one major piece of IKEA furniture, and it has all held up very well - so of course we were nearly certain that we'd get our kitchen cabinets there too.


Sometimes I feel like an IKEA apologist - I've talked to people who have a strong negative impression of IKEA products, but no actual experience with them. However, we've been very happy with all of our IKEA furniture, and the assembly is actually kind of fun. Our friends who have IKEA kitchens are also all happy with them. We also like the modern styling and clean lines. It is interesting to see which side of the fence people fall on when we say we're planning an IKEA kitchen. 

For due diligence, we got a quote from a local contractor who had done kitchen renovations for a few friends and acquaintances. For $25k, they would replace the cabinets and the counters, and add another cabinet on the outer edge of our peninsula. No new appliances, no change in the layout - we were not impressed, and the proposed design seemed even more awkward. They were definitely not interested in IKEA cabinets either.

We started using the IKEA kitchen planner and came up with some preliminary designs - tear out the peninsula and add an island. I have some gripes with the software, but once I got the hang of it, it wasn't so bad. These observations helped preserve my sanity:
  • If you make an error, it is usually faster to just open the file again (without saving) than using the undo function
  • When you've clicked on an object, don't unclick until the object outline is green
I found a few helpful resources/examples online:
IKEA Kitchen Remodeling Blog 
    the free eBook on budgeting for an IKEA remodel was helpful, as were the blog entries
The Kitchn - an IKEA remodel
    a nice overview of the process by a couple on the East Coast

Ultimately we decided to pay for the Individual Kitchen Planning Service ($199) through IKEA. We considered just getting the measurement service, but based on our own measurements, we knew that maximizing our space would be a challenge. We knew we didn't want to make major structural changes (i.e., we won't move walls or windows). Our planner (Scott) was helpful - he figured out how much of the soffits we could actually remove, and was able to incorporate customized cabinets (e.g., 10" wide) when needed. Definitely money well-spent.

We needed to keep the soffit on the north wall (it contains a large drain pipe for an upstairs bathroom), and we want to keep the section on the east wall to allow for venting the microwave to the outside. 

Here is our final design - some aspects are similar to the perimeter of our current layout:


Top view


North wall
East wall
South wall

Motivation

We moved into our first home when it was exactly 10 years old (in 2007). After years in somewhat tolerable apartments on a grad student budget, we were thrilled. We weren't in love with the kitchen, but it was a major improvement for us.


Shortly after moving in we made our first major purchase: replacing the dishwasher. The original Hotpoint model was in rough shape. For a few years the LG dishwasher worked well, but then it needed several repairs, which were complicated by the previous owner's installation of a tile floor. Accessing the dishwasher required shimming the counter to provide clearance over the lip of the tile floor. This was a major undertaking and would often result in salty language and a beer to soothe nerves afterwards. Nate developed a relationship with that machine akin to that of the father in 'A Christmas Story' and his nemesis, the furnace. 


The frequent repairs (and hassle of extracting the dishwasher from under the counter) was a major annoyance, but we could cope. Then the drain line disintegrated and we had water damage through the subfloor into our basement - which ultimately led to our kitchen renovation moving forward several years.


Mr. BC expressing his feelings about the evil dishwasher


Other issues we wanted to address:

-The existing layout has bottlenecks
-The cabinets are getting worn out (and look dated)
-There is additional water damage under the sink and at the laminate backsplash (and we have a constant battle with crud around the lip of the top mount sink)
-The space for the refrigerator is too small for most current models (and there is no water line)
-The gas range was wearing out, and we wanted a double oven
-Tearing out some of the soffits would provide more storage space

Individually, these might seem like minor complaints, but we really felt like it was time to make our kitchen more user-friendly and appealing to us.